
This Fermented Honey Garlic comes together in about 30 minutes of active prep time and requires just a little waiting for that gorgeous fermentation magic to happen! All you need is a jar and a few ingredients for a simple, homemade addition to your meals that your family will love! Seriously, everyone will be asking for more!
Ingredient Breakdown
For Fermentation
- 2-3 bulbs peeled garlic cloves The more, the merrier! Infuses flavor into dishes.
- 1 jar Fido jar or jar with a cover Ensure it has an air-tight closure for proper fermentation.
- to taste raw honey Make sure to use raw honey to promote fermentation.
- N/A patience The fermentation process requires about four weeks.
Let’s Get Cooking!
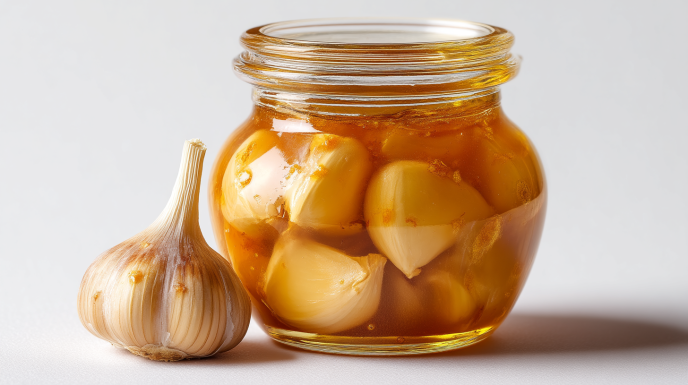
Prepare the Jar: Start with a clean dry jar. You’ll want to place the peeled garlic cloves inside. Make sure to leave a little room at the top, as the fermentation process can create bubbles. You don’t want any blow-ups!
Pour in the Honey: Next, pour raw honey into the jar, covering the garlic cloves completely. Remember, you want to ensure that there’s still space at the top. As the garlic ferments, it may bubble, and we want to prevent messes!
Close and Burp: Secure the lid on the jar. Don’t forget to “burp” it regularly for the first week or two, just carefully open the lid slightly to let the gases escape and then close it back up! Keeping the garlic fully submerged in honey is crucial.
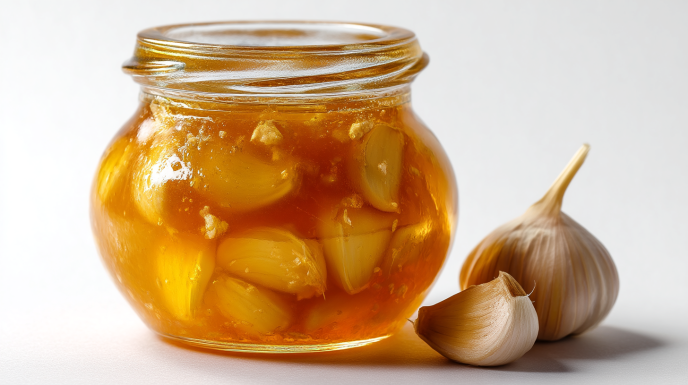
Time to Wait: Now, just let the mixture sit at room temperature, away from direct sunlight for about four weeks. You’ll notice that the garlic cloves will darken, and the honey will become a tad more liquid-y, which means it’s doing its thing!
Enjoy the Magic: After four weeks, you can start using your homemade fermented honey garlic! The garlic will have a delightful flavor, and the honey will shine with its sweetness.
If you loved this Fermented Honey Garlic recipe, be sure to check out my Air Fryer Honey Garlic Salmon Bites !
What Makes This Recipe Special
Quick & Easy
Comes together in under 30 minutes of active prep time! After that, all you have to do is wait. Seriously, it’s such a no-fuss recipe that takes minimal effort but gives you maximum flavor!
Crowd-Pleaser
This dish manages to appeal to everyone! Garlic lovers will rejoice, and even those who are not the biggest fans will be impressed by its new flavor profile.
Customizable
Use whatever ingredients you have on hand! Need to use different herbs or spices? Go for it! Want to try adding some chili flakes for a kick? Absolutely!
Comfort Food
I just love how comforting this recipe can be! It kind of feels like a warm hug that lasts when you use it in your cooking. Plus, it’s perfect for those cozy, chilly evenings at home.
Make-Ahead Friendly
The best part is that it’s a set-it-and-forget-it type of recipe. Perfect for those busy weeknights when you know you’ll want to whip up something quick and delicious later!
How to Serve This Fermented Honey Garlic
Serving Suggestions
You’ll find that this flavorful honey garlic mix pairs perfectly with everything. I love adding it to roasted meats, drizzling it over freshly baked bread, tossing it into stir-fries, or simply using it as a condiment. It’s such a versatile addition!
Storage
Once prepared, fermented honey garlic can last for months in your refrigerator. Just ensure it’s tightly sealed. The flavors actually deepen over time, so don’t be shy about keeping it longer!
Reheating Instructions
If you want to use the garlic in cooking, simply add it straight to your pans as needed. No need to heat it separately; just toss it in with whatever you’re cooking at the moment to unlock those wonderful flavors!
Freezer Friendly
While it’s best kept in the fridge due to the honey’s texture change, it is freezer friendly! If you ever have excess, just pour it into an ice cube tray, freeze, and pop out a cube whenever you need a quick flavor boost!
And there you have it! A super simple, utterly versatile Fermented Honey Garlic that you and your family will love. It’s really one of those recipes that’s perfect for any busy weeknight and adds so much flavor to your meals, you’ll find yourself reaching for it time and time again. Enjoy your culinary adventure!
Follow us on Pinterest for daily meal inspiration!
Fermented Honey Garlic
Ingredients
Method
- Start with a clean dry jar. Place the peeled garlic cloves inside, leaving some room at the top.
- Pour raw honey into the jar, covering the garlic cloves completely, while ensuring there is still space at the top.
- Secure the lid on the jar, and remember to ‘burp’ it regularly for the first week or two.
- Let the mixture sit at room temperature, away from direct sunlight for about four weeks.
- After four weeks, the garlic will have darkened, and the honey will be more liquid; you can start using it.