
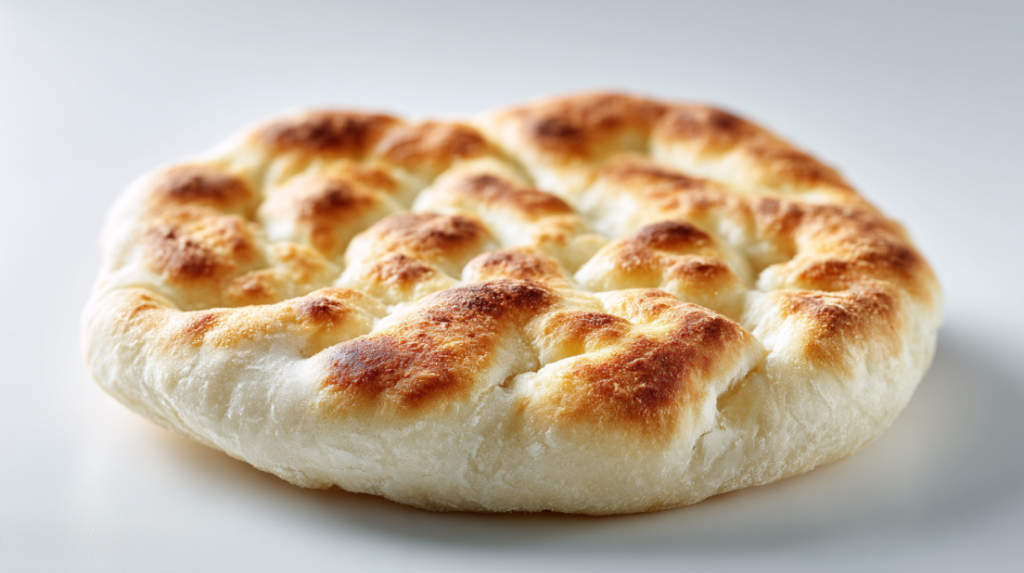
This No-Oven Turkish Bread (Bazlama) comes together in about 30 minutes and is cooked on the stovetop for a quick and easy weeknight meal that your family will love! Switch up the ingredients to suit your taste or use it as a “clean out the fridge” meal to get rid of leftovers and odds and ends! Whether you’re dipping it in soup or serving it alongside your favorite main dish, this bread is super versatile and a total crowd-pleaser.
Ingredient Breakdown
- All-Purpose Flour
- Yogurt
- Baking Powder
- Salt
Let’s Get Cooking!
How to Make No-Oven Turkish Bread (Bazlama)
Mix the Ingredients : Start by grabbing a mixing bowl, one big enough to get your hands in. Combine 2 cups of all-purpose flour, 1 cup of yogurt, 1 teaspoon of baking powder, and a nice pinch of salt. Stir it all together until it’s well combined. You’re making a mess, but don’t worry; it’s all part of the fun!
Knead the Dough : Once the mixture is looking like it might actually come together (think dough clumps rather than floury chaos), turn it out onto a floured surface. Knead the dough gently for about 5 minutes until it’s soft and just a touch sticky. If it’s too sticky, add a teaspoon or two of flour. Trust me; it’ll be worth it!
Shape the Rounds : Now, divide your dough into equal portions, about 6-8 pieces depending on how big you want your bazlamas. Roll each piece into a ball and gently flatten it into a round disk about ½ inch thick. Make sure they’re not perfect; rustic shapes are totally acceptable and actually preferred, they give off that homemade vibe!
Heat the Skillet : Get a non-stick skillet heating over medium heat. No oil necessary, trust me! You want that lovely golden crust without it becoming greasy.
Cook the Bread : When the skillet is hot (you can test it by flicking a tiny drop of water on it, you want a nice sizzle!), add your rounds one at a time. Cook each piece for about 2-3 minutes on each side, until they’re beautifully golden brown. You’ll know they’re ready because they’ll start puffing up, it’s magical to watch!
Serve Warm : That’s it! Serve your bazlama warm and enjoy the compliments coming your way. They pair wonderfully with just about anything, from dips to soups or alongside a comforting stew.
Why I Love This Recipe
Oh boy, let me tell you, this is my go-to recipe when I want something quick and satisfying! I’m a real sucker for warm, freshly baked bread, and the best part is that you don’t even need an oven. This bazlama is one of those comfort foods that brings everyone together. Whether it’s for a casual lunch or a cozy dinner, it’s truly a family favorite around here. And the flexibility of switching up ingredients? I mean, you can use whatever you’ve got on hand! How cool is that?
If you loved this No-Oven Turkish Bread, be sure to check out my Turkish Inspired Eggs Cilbir, my Turkish Pita, or my Homemade Manti (Turkish Dumplings)!
Why This Recipe Works
Quick & Easy
This bazlama literally comes together in under 30 minutes. Perfect for busy weeknights when you want something hearty but absolutely don’t have hours to spend in the kitchen.
Minimal Cleanup Required
Since this is a stovetop method, you’ll only need one pan, and there’s no baking sheet or mixing bowls galore to clean up afterward. Just your mixing bowl and skillet, easy peasy!
Customizable
Feeling adventurous? You can jazz this bread up by adding herbs, spices, or even cheese to the dough. It’s super flexible, which means you won’t get bored of making it, and it’s perfect for using up leftovers!
Comfort Food
There’s something about fresh bread that feels like a warm hug. Seriously, there’s a comfort level that comes with pulling a warm bazlama from the skillet. It’s a total hug in food form.
Kid-Approved
I can’t tell you how many times my kids have asked for seconds (and even thirds!). This recipe is loaded with tons of flavor, and it’s fun to eat, who doesn’t love tearing pieces off warm bread?
Serving and Storage Tips
What to Serve With This
Bazlama makes a fantastic accompaniment to soups, stews, or even as a wrap for your favorite fillings. Consider stuffing it with roasted veggies, grilled chicken, or falafel.
Storage
Leftovers? No problem! Store any uneaten bazlama in an airtight container in the refrigerator for up to 3 days.
Reheating Instructions
Simply pop it back on the skillet over low heat for a couple of minutes to warm it through. You want to bring that lovely soft texture back to life!
Freezer Friendly
Yes, this recipe is freezer-friendly! Wrap each piece in plastic wrap and then put them in a freezer bag. They’ll stay fresh for up to 3 months. Just thaw and reheat when you’re ready to dig in again!
So, there you have it my quick and easy No-Oven Turkish Bread (Bazlama) that your family is bound to love. It’s simple, comforting, and oh-so-delicious! Trust me, the joy on your family’s faces after pulling this fluffy goodness off the skillet will make it all worth it. Enjoy your cooking adventure, and don’t forget to share some bread love!
Remember, cooking is all about experimenting and having fun! So don’t be afraid to play around with this recipe and make it your own. Happy cooking! Follow us on Pinterest for daily meal inspiration!

No-Oven Turkish Bread (Bazlama)
Ingredients
Method
- Combine 2 cups of all-purpose flour, 1 cup of yogurt, 1 teaspoon of baking powder, and a pinch of salt in a mixing bowl.
- Stir until well combined.
- Turn the mixture onto a floured surface and knead gently for about 5 minutes until soft and slightly sticky.
- If too sticky, add a teaspoon or two of flour.
- Divide the dough into 6-8 equal portions.
- Roll each piece into a ball and gently flatten into a round disk about ½ inch thick.
- Heat a non-stick skillet over medium heat.
- Add the rounds one at a time and cook for about 2-3 minutes on each side until golden brown.
- Watch for puffing up to indicate readiness.
- Serve warm and enjoy with dips, soups, or as a wrap for fillings.