
This S’mores Sourdough Bread comes together in about 12-16 hours of rising time (the majority of which is hands-off!) and bakes up in a Dutch oven for a cozy treat your family will love! Switch up the chocolate or use those random bits of candy in your pantry to suit your taste, or even use it as a “clean out the fridge” bread to use up odds and ends. Because, let’s be honest, who doesn’t want the nostalgic taste of summer s’mores in a warm, homemade loaf!?
Ingredient Breakdown
Here’s what you’ll need to whip up this sweet treat:
- 1 ½ cups (360 grams) warm water (80-90℉)
- ½ cup (100 grams) active sourdough starter
- 4 cups + 3 tablespoons (500 grams) bread flour
- 3 ½ teaspoons (10 grams) Diamond Crystal Kosher Salt
- 3 bars (130 grams) Hershey’s Milk Chocolate (roughly chopped)
- 1 cup (110 grams, 7 cracker sheets) graham crackers (crushed)
- 1 cup (45 grams) mini marshmallows
- Rice flour (for proofing basket)
- 2 ice cubes (for steam)
Let’s Get Cooking!
So, the first thing you’re going to want to do is feed your starter 6 to 12 hours ahead of time. You want it to be nice and bubbly, just bursting with life!
Mix It Up! In a large mixing bowl, whisk together the warm water and sourdough starter until mostly dissolved. Then, add in your bread flour and salt; mix until no dry flour remains and a shaggy dough forms. Pretty straightforward, right? Cover it up and let it rest for about 20 minutes.
Stretch & Fold: Now, lightly wet your hands (trust me, it helps!) and gently flatten the dough in the bowl. Sprinkle about ¼ of the chopped chocolate on top and do what’s called a stretch and fold. Basically, lift one side of the dough, stretch it up, and fold it over itself. Rotate your bowl 90 degrees, add another ¼ of the chocolate, and repeat until all the chocolate is in the dough. Shape it into a loose ball and place it seam-side down in the bowl. Cover and let it rest for another 20 minutes, it’s a waiting game, but oh so worth it!
The Waiting Game: You’ll want to do this stretch and fold process one more time, for a total of 4 rounds, spaced 20 minutes apart. Each time, go ahead and add the next segment of chocolate glory, and you’ll see it start to come together beautifully.
Let It Rise: After those rounds, cover the bowl again and let that lovely dough rise at room temperature until it’s nearly doubled in size, this can take anywhere from 4 to 12 hours depending on your room’s warmth and your starter’s strength. Feeling impatient? You can also let it rise in a warmer spot, like the oven with just the light on.
Shape It Up: Once it’s looking all bubbly and jiggly, lightly flour your work surface and turn the dough out onto it. Stretch it into a rough rectangle. Evenly sprinkle the crushed graham crackers over the surface, followed by the mini marshmallows, but leave about a one-inch border along one of the edges, this helps the dough to seal better when you roll it up.
Roll It Up: Starting at the edge opposite the one-inch border, roll the dough tightly (like a jelly roll!) and tuck in any marshmallows that might show their faces. Pinch the seam at the end to seal it up nicely.
Proofing Time: Dust your oval proofing basket generously with rice flour, and transfer the dough seam-side up into the basket. If it’s not sealing perfectly, just pinch it a bit. Cover and pop it in the fridge for 12 to 16 hours, this overnight proofing is what gives the bread that amazing flavor and chewy texture.
Baking Day: The next day, place your lidded Dutch oven inside the oven and preheat to a steaming-hot 450°F. Let that bad boy heat for about 30-60 minutes once it reaches temperature.
Score & Steam: Turn the dough out onto a bread sling, parchment paper works too! Score the top however you like it (I usually go for a simple cross) and toss in 2 ice cubes into the hot Dutch oven for that steam-producing magic. Quickly transfer your dough into the pot (careful not to burn yourself!) and cover with the lid.
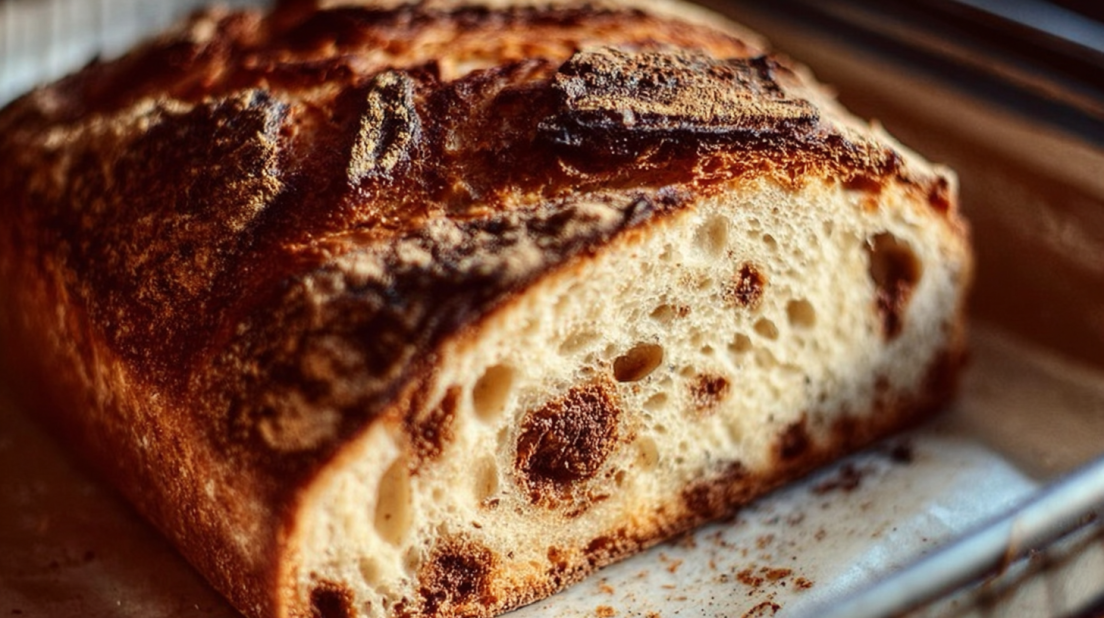
Time to Bake: Bake at 450°F for 45 minutes with the lid on. Then, remove the lid and bake for another 5 to 10 minutes until the crust reaches that gorgeous golden color you’re dreaming of.
Cool Down: Finally, remove the bread from the Dutch oven and let it cool on a wire rack for at least 2 to 4 hours before slicing into it. I know, it’s tough, but trust me this cooling time makes such a difference in texture!
Why I Love This Recipe
Honestly, this is my go-to recipe when I’m craving a little taste of nostalgia. I mean, who doesn’t love that campfire goodness of s’mores? This bread is comfort food at its finest, and I’m a real sucker for something that brings together warm bread, marshmallows, and chocolate. And the best part is you can customize it with whatever extra goodies you have lying around.
Whether it’s that half-eaten bag of M&Ms or leftover chocolate chips, toss them in! This is a great way to clean out the pantry and still impress everyone around your kitchen table.
If you loved this S’mores Sourdough Bread, be sure to check out my Sourdough Discard Brownies, my Sourdough Croissants, or my Sourdough Discard Pancakes! Each of these recipes is simple, delicious, and loved by my family.
Why This Recipe Works
Comfort Food
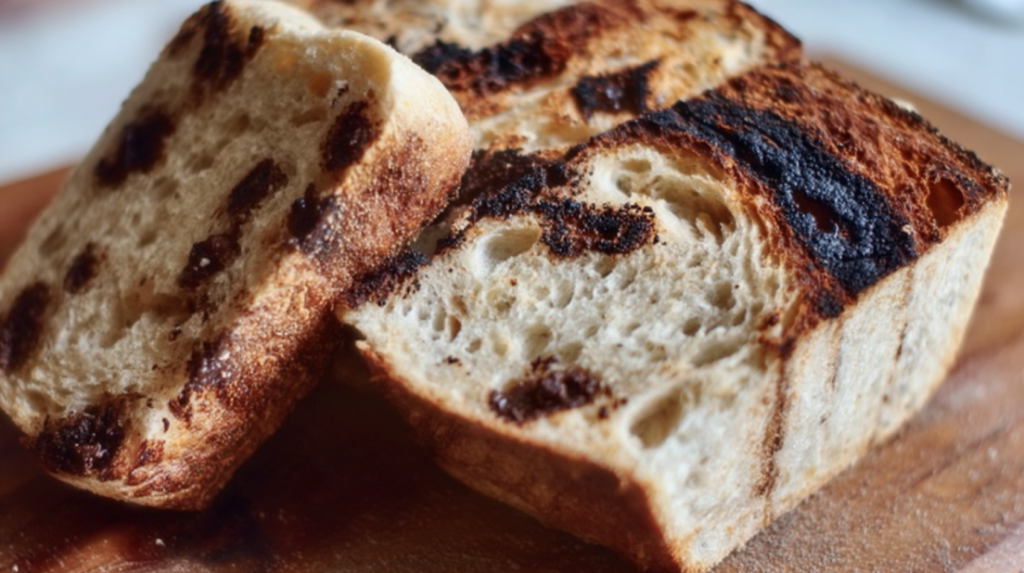
This S’mores Sourdough Bread is loaded with tons of flavor! The combination of warm, gooey marshmallows and rich chocolate tucked inside a crisp crust creates that warm hug-feeling we all crave from comfort food.
Customizable
Feel free to use whatever ingredients you have on hand! I mean, if you only have a chocolate bar with almonds, go for it. The versatility of this bread makes it super fun to create your dream s’more loaf.
Crowd-Pleaser
You guys, just picture it: fresh-baked bread coming out of your oven, and everyone gathered around waiting for a slice. It’s great for gatherings or just as a warm family treat after dinner. Trust me, everyone will be asking for the recipe!
Make-Ahead Friendly
The overnight proofing makes this bread ideal for busy schedules. You can prep your dough the night before, then just slice and bake for a warm breakfast or a gorgeous afternoon snack.
Quick & Easy
Coming together in about 12-16 hours (most of which is just waiting!), this is a low-effort high-reward recipe. You won’t believe how easy it is!
Serving and Storage
How to Serve This S’mores Sourdough Bread
Serve it plain, toasted, or with a smear of butter for a cozy treat. Honestly, it’s perfect on its own, but if you really want to treat yourself, drizzle a bit of chocolate sauce on top or serve it with hot cocoa for a little dessert extravaganza!
Storage
This bread can typically keep for about 3-4 days stored at room temperature in a bread box or an airtight container. I like to slice it to keep it fresh!
Reheating Instructions
For the best experience, I recommend toasting slices in a toaster or on a skillet to refresh that crispy crust. But if you’re in a hurry, a quick zap in the microwave (15-20 seconds) will do, just be careful not to overdo it!
Freezer-Friendly?
Absolutely! Just wrap your bread tightly in plastic wrap and place it in a freezer-safe bag. It can keep in the freezer for up to 3 months. When you’re ready to enjoy, let it thaw in the fridge overnight and toast it when you want warm slices again!
And there you have it, comfort food in bread form! Whether you’re reminiscing about summer nights or just need a sweet treat, this S’mores Sourdough Bread is your new go-to recipe. Trust me, you won’t want to miss out on this!
Let me know how yours turns out, happy baking! Follow us on Pinterest for daily baking inspiration that brings warmth to your table!
S’mores Sourdough Bread
Ingredients
Method
- Feed your sourdough starter 6 to 12 hours ahead of time.
- In a large mixing bowl, whisk together the warm water and sourdough starter until mostly dissolved.
- Add in the bread flour and salt; mix until no dry flour remains and a shaggy dough forms.
- Cover the dough and let it rest for about 20 minutes.
- Wet your hands lightly and flatten the dough in the bowl.
- Sprinkle ¼ of the chopped chocolate on top and perform a stretch and fold: lift one side of the dough, stretch it up, and fold it over itself.
- Rotate the bowl 90 degrees, add another ¼ of the chocolate, and repeat until all the chocolate is incorporated.
- Shape the dough into a loose ball and let it rest covered for another 20 minutes.
- Repeat the stretch and fold process for a total of 4 rounds, spaced 20 minutes apart.
- Cover the bowl and let the dough rise at room temperature until nearly doubled in size (4 to 12 hours depending on conditions).
- Once risen, lightly flour your work surface and turn the dough out.
- Stretch it into a rectangle, sprinkle crushed graham crackers and mini marshmallows over the surface, leaving a one-inch border.
- Roll the dough tightly from the edge opposite the border and pinch the seam to seal.
- Dust your proofing basket with rice flour and transfer the dough seam-side up.
- Cover and place in the fridge for 12 to 16 hours.
- Preheat your oven to 450°F with a lidded Dutch oven inside for 30-60 minutes.
- Turn the dough onto a bread sling, score the top, and add 2 ice cubes to the hot Dutch oven.
- Transfer the dough into the pot and cover with the lid.
- Bake for 45 minutes with the lid on, then remove the lid and bake for an additional 5 to 10 minutes, until golden.
- Remove the bread from the Dutch oven and cool on a wire rack for 2 to 4 hours before slicing.