
These Oreo Sushi Rolls come together in about 15 minutes and are a delightful no-bake treat that your family will love! Whether you’re hosting a fun movie night or just want to surprise your kids with a unique dessert, these sweet sushi rolls are the perfect way to mix things up. You can easily switch up the fillings based on what you have on hand or even use them as a fun way to “clean out the fridge.” So grab your Oreos and let’s get rolling!
Ingredients You’ll Need
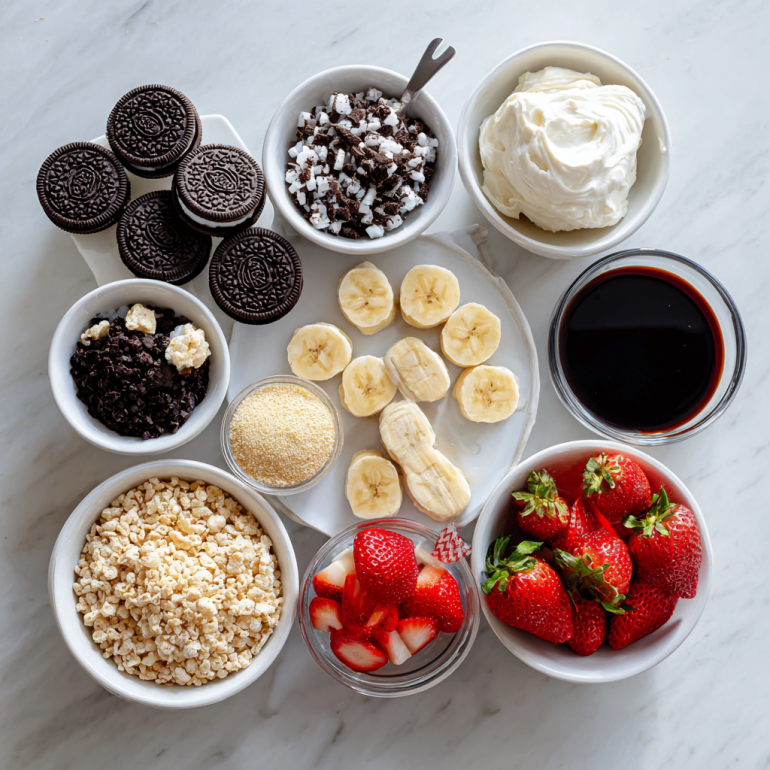
- Oreos
- Cream Cheese
- Rice Krispies Cereal
- Fruit (Banana or Strawberries)
- Chocolate Syrup (Optional)
How to Make Oreo Sushi Rolls
Now, let’s jump into the fun part, making these delicious Oreo sushi rolls!
Prep Your Oreos (2 minutes)
Start by crushing about 10 Oreos in a food processor until they’re finely ground. If you don’t have a processor, you can put them in a zip-top bag and smash them with a rolling pin or your hands, it’s therapeutic, trust me!Mix the Filling (3 minutes)
In a bowl, combine the crushed Oreos with 4 oz of softened cream cheese. Mix until everything is well-combined and creamy. You’re looking for a texture that holds together but isn’t too sticky. If it’s too thick, add a little bit of milk to loosen it up.Roll It Out (5 minutes)
Lay parchment paper on a flat surface. Scoop your Oreo mixture onto the parchment and use your hands to shape it into a rectangle, about 1/2 inch thick. Make sure you press it down firmly so it holds together!Add the Crunch (2 minutes)
Sprinkle 1 cup of Rice Krispies evenly across the rectangular layer of Oreos, pressing them in lightly for extra crunch.Add the Fruit (2 minutes)
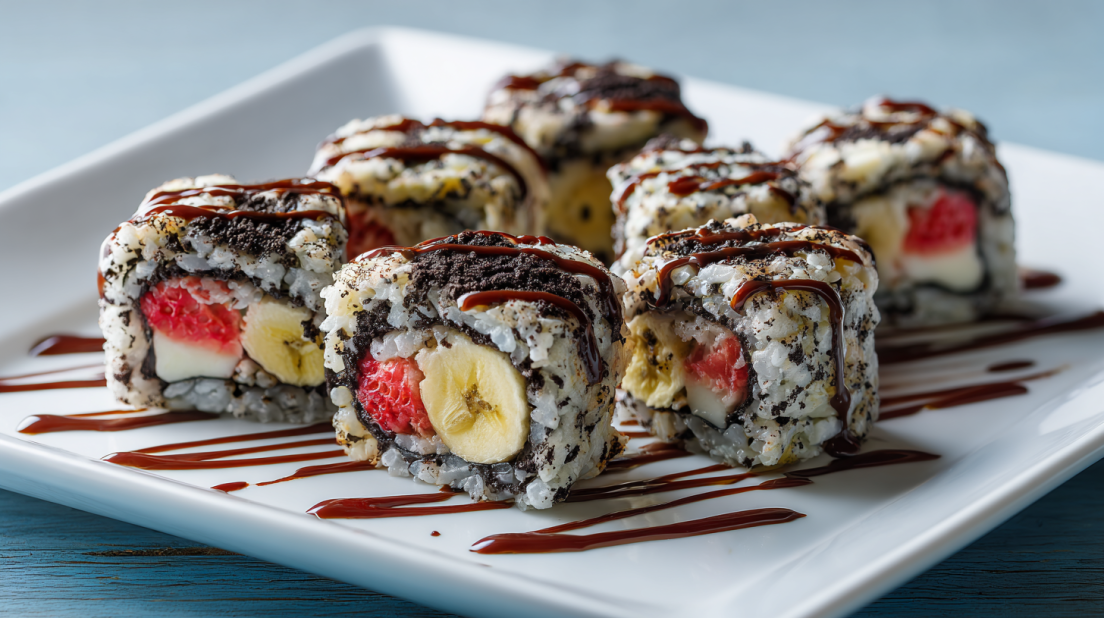
Now, slice your fruits of choice (like bananas or strawberries) thinly and place them in a line along one edge of the Oreo rectangle. This will be the filling of your sushi rolls!Roll It Up (3 minutes)
Carefully lift the edge of the parchment paper and start rolling the Oreo rectangle away from you, tightly wrapping the fruit inside. It’s kind of like making a burrito! Keep rolling until it’s completely wrapped up.Slice and Serve (3 minutes)
Using a sharp knife, slice your sushi roll into 1-inch pieces. You want them to be bite-sized but not too small, just like traditional sushi!Drizzle with Chocolate Syrup (if desired)
For that extra touch, drizzle some chocolate syrup over the sliced rolls or present them alongside a small bowl of chocolate syrup for dipping. Yum!

Why I Love This Recipe
Honestly, these Oreo Sushi Rolls are my go-to recipe when I want to create something fun and a little different. They’re such a hit with my family, and let me tell you, my kids are notoriously picky eaters! But these? They’re all over them. I’m a real sucker for anything that combines sweet and crunchy, and these definitely fit the bill. And the best part is, they’re so customizable! You can use whatever you’ve got on hand, and they always turn out delicious!
If you loved this recipe, be sure to check out my Gingerbread Pudding Cake, my Chocolate Chip Cookie Dough Dip, and my Air Fryer Chocolate Lava Cakes!
Tips for Success
Quick & Easy
These quick and easy Oreo Sushi Rolls typically come together in under 30 minutes perfect for a busy weeknight dessert! Minimal prep means more time enjoying!
Customizable
The versatility of this recipe means you can mix and match flavors. Swap out fruits, try different cream cheese flavors, or add in layers of Nutella or peanut butter for an indulgent twist. You really can make this recipe your very own!
Crowd-Pleaser
Trust me, these rolls are a total crowd-pleaser! Serve them at your next gathering, and everyone will be asking for the recipe. They’re fun, cute, and delicious, what more could you want?
Serving and Storage Tips
How to Serve This Recipe
Serve these Oreo Sushi Rolls for dessert or even a fun snack! They pair beautifully with a scoop of vanilla ice cream or a cup of cold milk. Just imagine!
Storage
These rolls are best enjoyed fresh, but you can store leftovers in an airtight container in the fridge for up to 2 days. Just be aware that the texture may change slightly after a day or so.
Reheating Instructions
There’s no need to reheat these just enjoy them cold! If you prefer a warm treat, you can microwave them for 10-15 seconds, but I’d recommend having them cold for the ultimate crunch and flavor combo.
Freezer Friendly
Yes! You can freeze these sushi rolls. Just slice them beforehand, arrange them on a parchment-lined baking sheet and freeze. Once frozen, transfer them to a freezer-safe bag. They’ll keep for about 3 months! Pop them in the fridge to thaw before serving.
The fun doesn’t stop here! Give these Oreo Sushi Rolls a try, and I promise, you’ll fall in love with them just like my family has. They’re quick, easy to make, and a great way to get the kids involved in the kitchen too! Enjoy rolling your own delicious sushi treats!
Have any fun twists to share or questions about making these fabulous Oreo Sushi Rolls? Drop them in the comments! Can’t wait to hear about your combinations!
For more impressive desserts that look complicated but are surprisingly simple, follow us on Pinterest for weekly inspiration that proves you don’t need professional training to make restaurant-quality sweets!
Oreo Sushi Rolls
Ingredients
Method
- Crush about 10 Oreos in a food processor until finely ground.
- In a bowl, mix the crushed Oreos with 4 oz of softened cream cheese until well combined.
- Lay parchment paper on a flat surface and shape the Oreo mixture into a rectangle, about 1/2 inch thick.
- Sprinkle 1 cup of Rice Krispies evenly across the rectangular layer of Oreos.
- Slice your fruits thinly and place them in a line along one edge of the Oreo rectangle.
- Lift the edge of the parchment paper and start rolling the Oreo rectangle tightly around the fruit.
- Slice the rolled sushi into 1-inch pieces and serve.
- Drizzle with chocolate syrup if desired and enjoy cold.