
This Cheese and Grape Skewers recipe comes together in about 15 minutes and is completely no-bake for an easy appetizer or snack that your family will love! Whether you need a quick party dish, a fun after-school snack, or a light lunch, these skewers are perfect for any occasion!
Ingredient Breakdown
Main Ingredients
- 1 cup Balsamic Glaze Can substitute with honey or fresh lemon juice.
- 2 cups Juicy Grapes (Red or Green) Can substitute with leftover fruit like apple or pear.
- 8 slices Prosciutto Can substitute with salami or turkey breast.
- 1 cup Gouda Cheese, cubed Can substitute with cheddar or mozzarella.
- 1 cup Fresh Arugula Can substitute with spinach or omit if not available.
Let’s Get Cooking!
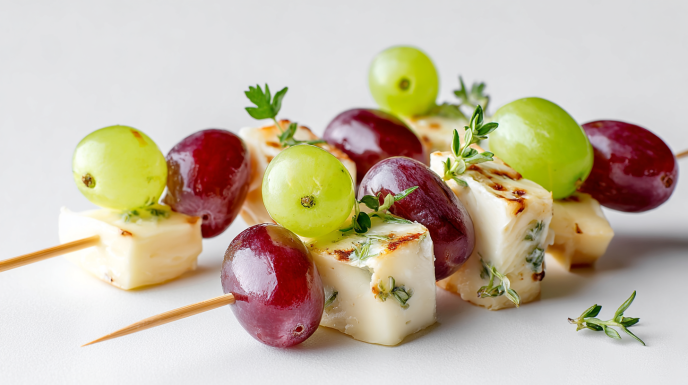
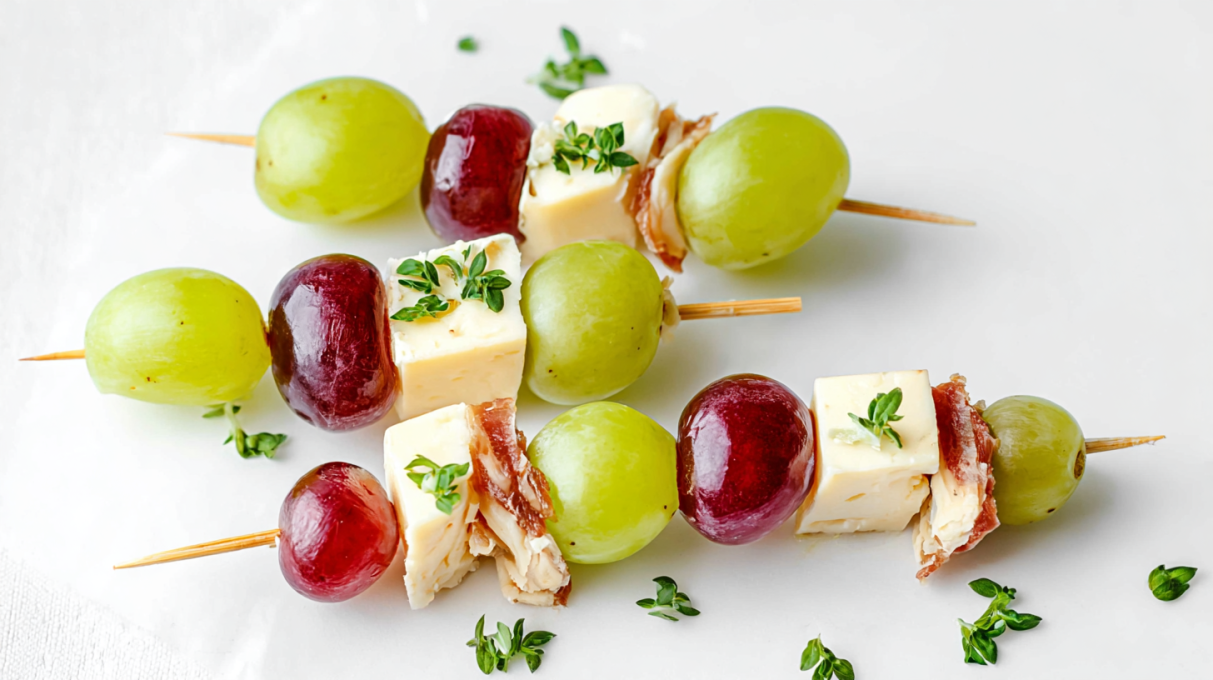
Thread the Goodies: Start by grabbing some skewers. For this, I like to use wooden or bamboo ones, just an inch or two longer than your fruits and cheeses are tall. Now, thread on your first grape, followed by a piece of prosciutto, a cube of Gouda, and some fresh arugula. Repeat until your skewer is filled to satisfaction! You can get creative here; I usually aim for 3-4 of each item per skewer.
- Timing Tip: This part should take about 5 minutes max!
Arrange and Serve: Once the skewers are ready, arrange them beautifully on a serving platter. You can play with the presentation, like standing them upright in a jar or laying them down flat. It’s all about impressing your guests, right?
- Timing Tip: This step only takes about 2 minutes!
Drizzle and Enjoy: Drizzle a generous amount of balsamic glaze over the skewers just before you serve. Watch as everyone’s eyes light up at the sight of these beautiful, colorful bites!
- Timing Tip: This last step should take about 1 minute.
And there you have it! Enjoy your delicious cheese and grape skewers!
If you loved these Cheese and Grape Skewers, be sure to check out my Air Fryer Egg and Cheese Toasts!
What Makes This Recipe Special
Crow-Pleaser
Honestly, these skewers are a hit at every gathering! People just love the combination of flavors. The sweet and juicy grapes, salty prosciutto, and creamy Gouda create a perfect little bite. Whether it’s a casual family dinner or a festive gathering, your friends and family will rave about this one.
Customizable
The beauty of these Cheese and Grape Skewers is their adaptability. You can use whatever odds and ends you have in your fridge or pantry. Fancy some peppers or olives? Throw them on there! Want to go vegetarian? Ditch the prosciutto and load up on extra veggies!
Quick & Easy
I can’t emphasize this enough, this recipe comes together in under 15 minutes! You can spend more time enjoying your guests and less time slaving in the kitchen. Plus, with no cooking required, cleanup is a breeze. It’s a win-win!
Presentation Factor
These skewers are gorgeous! Just imagine a colorful platter lined with neatly arranged skewers, it just exudes fun! They’re perfect for parties, picnics, or even just a special family dinner. People will think you spent hours making them when, in reality, you whipped them together in minutes.
Nourishing Option
They’re not just pretty, they’re packed with nutrients too! Grapes provide vitamins C and K, while arugula offers plenty of antioxidants. I love knowing that I’m serving my family something that’s not only delicious but good for them, too!
Serving and Storage Tips
How to Serve This Cheese and Grape Skewers
These skewers are best served fresh, but you can make them a few hours in advance if you need to! Just keep them covered in the fridge until you’re ready. Pair them with some crackers or a light dip for extra flair, and voilà, you’ve got yourself a fabulous appetizer!
Storage
If you happen to have leftovers (which is rare!), they can be stored in an airtight container in the fridge for up to 2 days. Just keep in mind the arugula might wilt a little, but they’ll still taste great!
Reheating Instructions
These skewers are perfect cold or at room temperature, so you definitely don’t need to reheat them. However, I recommend not freezing them, as the texture of the grapes and cheese may change after thawing. Enjoy them fresh, it’s just better that way!
So there you have it, quick, easy, and oh-so-delicious Cheese and Grape Skewers! Perfect for any occasion where you need to impress, without all the fuss. With just a few simple ingredients, you can create a dish that looks fancy but is incredibly simple to make. I hope you give this recipe a go soon!
Thank you for joining me in the kitchen today! I can’t wait to hear how your skewers turn out! And follow us on Pinterest for daily meal inspiration!
Cheese and Grape Skewers
Ingredients
Method
- Grab some skewers and thread on a grape, followed by a piece of prosciutto, a cube of Gouda, and some fresh arugula. Repeat until the skewer is filled.
- Aim for 3-4 of each item per skewer.
- Arrange the skewers beautifully on a serving platter.
- You can stand them upright in a jar or lay them down flat for a nice presentation.
- Drizzle balsamic glaze over the skewers just before serving.