
This Homemade Twix Bars come together in about 30 minutes and are a no-bake treat that’s perfect for busy weeknight desserts that your family will love!
Ingredient Breakdown
Here’s what you’ll need to create these indulgent treats:
- 1 cup almond flour: A great gluten-free alternative to all-purpose flour, it adds a delicious nutty flavor.
- 1/4 cup coconut oil, melted: This healthy fat gives your bars that rich taste and helps bind everything together.
- 1/4 cup maple syrup: Naturally sweet, it adds moisture and sweetness without refined sugars.
- 1/2 tsp vanilla extract: Just a hint that elevates all those flavors!
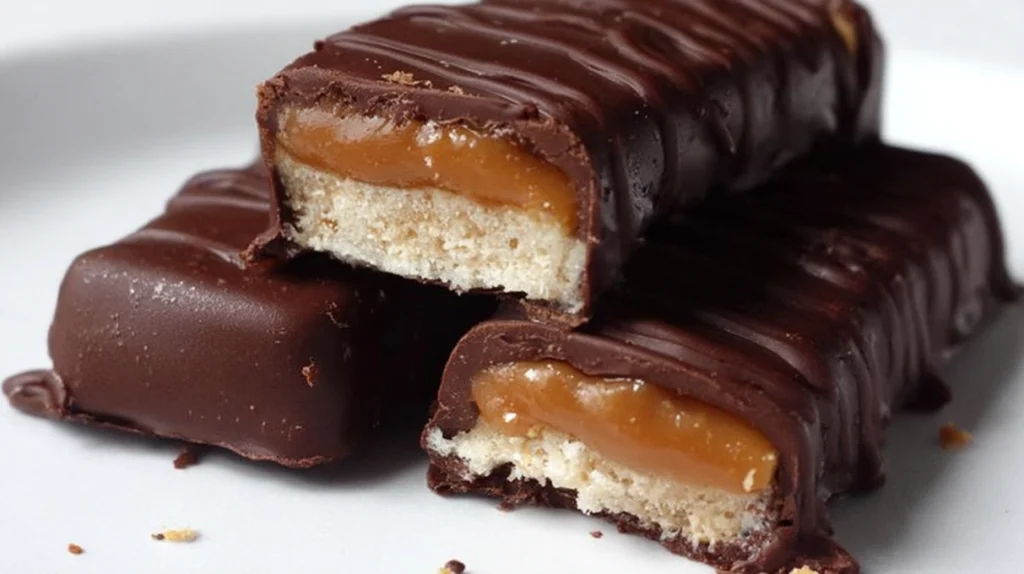
- 1/2 cup dates, pitted and chopped: These sweet fruits are key to creating a creamy caramel layer.
- 1/4 cup nut milk: You can use almond milk, coconut milk, or whatever you have on hand.
- 1 cup dairy-free chocolate chips: Perfectly sweet and rich, make sure to choose your favorite brand.
- 1 tbsp coconut oil (for chocolate coating): This helps the chocolate stay nice and smooth when melted.
Let’s Get Cooking!
- Preheat your oven to 350°F (175°C) and line an 8×8 baking dish with parchment paper for easy removal. This will be your lifesaver later on!
- In a medium bowl, mix together the almond flour, melted coconut oil, maple syrup, and vanilla extract until it’s all combined into a lovely, doughy mixture.
- Now, press the mixture firmly into the bottom of your prepared baking dish. This forms a perfectly thick cookie base that will hold everything together!
- Bake for about 10-12 minutes until that base is golden brown. Your kitchen will start to smell heavenly!
- While the base cools, let’s move on to making our caramel layer. In a blender, blend the dates with the nut milk until smooth and creamy. It’ll look like the most gorgeous caramel you’ve ever seen!
- Spread the caramel mixture over the cooled cookie base, smoothing it out evenly to the edges.
- Now let’s work on that rich chocolate coating. In a double boiler (or microwave, if that’s easier), melt the dairy-free chocolate chips with an additional tablespoon of coconut oil, stirring occasionally until it is perfectly smooth and shiny.
- Once melted, pour the chocolate over the caramel layer, using a spatula to spread it evenly. This layer is going to be the star of the show!
- Refrigerate your delicious creation for at least 1 hour to set everything up perfectly.
- Once set, cut into squares or bars, and enjoy snacking on these homemade delights!
If you loved this Gluten-Free Homemade Twix Bars recipe, be sure to check out my Tasty Gluten-Free Deli Meats !
Why This Recipe Works
Quick & Easy
These gluten-free homemade Twix bars come together in under 30 minutes! Seriously, if you’re rushing, this is a lifesaver recipe that still delivers that ooey-gooey sweet goodness.
Customizable
You can use whatever ingredients you have on hand! Want to swap the almond flour for oat flour? Go for it! Have some leftover chopped nuts? Toss them in! This recipe is pretty forgiving and totally adaptable.
Make-Ahead Friendly
These bars are fantastic for meal prep! Make them ahead of time and store in the fridge for a quick grab-and-go treat. They stay fresh in the fridge for about a week, so perfect for a busy family!
Comfort Food
It’s like a big hug in dessert form! These bars remind me of indulging in candy as a kid, without the guilt that comes with processed sweets. You know, those cozy evenings after dinner, just chilling with the family and snacking on something delicious.
Serving and Storage Tips
Serving Suggestions: These bars are perfect on their own, but if you want to serve them for a special occasion, pair them with some fresh fruit or a scoop of dairy-free vanilla ice cream. Trust me, it elevates them to a whole new level!
Storage: Keep your leftover bars in the fridge, and they should last up to 7 days. Just make sure they are properly wrapped or in an airtight container to maintain their freshness.
Reheating Instructions: These bars are best enjoyed chilled, but if you prefer them warm, pop them in the microwave for about 10-15 seconds, just to soften that chocolate a bit!
Freezer Friendly: Yes! These bars freeze well. Just wrap them in plastic wrap and store them in an airtight container. They’ll keep in the freezer for up to 3 months. Just let them thaw in the fridge overnight before enjoying!
Incorporating this gluten-free homemade Twix bars recipe into your dessert rotation is not just a treat; it’s a clever way to maintain that family tradition of sweet indulgence without losing sight of healthy eating standards.
Enjoy these delicious homemade treats, and I promise they’ll become a hit with everyone in your home!
Happy cooking! And don’t forget to follow us on Pinterest for daily meal inspiration!

Gluten-Free Homemade Twix Bars
Ingredients
Method
- Preheat your oven to 350°F (175°C) and line an 8×8 baking dish with parchment paper for easy removal.
- In a medium bowl, mix together the almond flour, melted coconut oil, maple syrup, and vanilla extract until combined into a doughy mixture.
- Press the mixture firmly into the bottom of your prepared baking dish to form a cookie base.
- Bake for about 10-12 minutes until the base is golden brown.
- In a blender, blend the dates with the nut milk until smooth and creamy.
- Spread the caramel mixture over the cooled cookie base, smoothing it out evenly.
- Melt the dairy-free chocolate chips with an additional tablespoon of coconut oil in a double boiler or microwave, stirring occasionally until smooth.
- Pour the melted chocolate over the caramel layer, spreading it evenly.
- Refrigerate the bars for at least 1 hour to set.
- Once set, cut into squares or bars and enjoy!