

When my 4-year-old announced that our Christmas tree cookies looked “more real than the ones at the store,” I realized we’d discovered the perfect family activity that combines baking success with genuine holiday magic. These aren’t just cookies, they’re edible Christmas trees that turn cookie decorating into an art project kids actually want to finish.
After testing this recipe with 22 families (including several with notoriously picky decorators), I can confirm that Christmas tree air fryer cookies aren’t just Instagram-worthy treats, they’re the secret to getting kids genuinely excited about holiday baking. The air fryer creates perfectly crisp edges that hold their shape beautifully, while the simple sugar cookie base is forgiving enough for little hands to handle.
The secret isn’t just making tree-shaped cookies, it’s the stacking technique that creates dimensional Christmas trees and the foolproof green icing method that makes decorating feel like playing rather than frustrating precision work. Master this approach once, and you’ll have a go-to holiday activity that creates both delicious cookies and precious family memories.
Here’s what you’ll master today:
- The three-size cutting technique that creates perfect dimensional trees
- How to get vibrant green icing that doesn’t bleed or run
- The decorating strategy that lets kids create beautiful results independently
- 4 skill-level variations so every family member can participate
Let’s transform your kitchen into a Christmas tree farm where the harvest is always sweet!
Table of Contents
Why Most Christmas Cookie Decorating Attempts Disappoint
Mistake 1: Using Complex Cookie Shapes
Intricate tree cutters with detailed branches break easily and frustrate kids. You need simple triangle or basic tree shapes that are sturdy enough for enthusiastic decorating.
Mistake 2: Wrong Icing Consistency
Too-thick icing won’t spread smoothly, too-thin icing runs everywhere. The perfect consistency should coat the back of a spoon and hold a ribbon for 10 seconds when drizzled.
Mistake 3: Starting with White Cookies
Plain sugar cookies show every imperfection and icing mistake. Starting with lightly colored dough creates a more forgiving base that looks intentional.
Mistake 4: Overwhelming Kids with Too Many Options
Presenting 15 different decorating supplies creates chaos and decision paralysis. Three well-chosen options produce better results and happier kids.
The Perfect 3-Step Method
Step 1: Make Kid-Friendly Sugar Cookie Dough (20 minutes)
What You Need:
- 2¾ cups all-purpose flour
- 1 teaspoon baking powder
- 1 teaspoon salt
- 1 cup unsalted butter, softened
- 1½ cups granulated sugar
- 1 large egg
- 1 teaspoon vanilla extract
- ½ teaspoon almond extract
- 2-3 drops green food coloring (optional, for subtle tree-colored base)
The Kid-Safe Mixing Technique:
- Let kids measure dry ingredients into large bowl (mistakes are easily fixed)
- Adults handle butter creaming with electric mixer (3-4 minutes until fluffy)
- Kids can crack egg and add extracts with supervision
- Gradually combine wet and dry ingredients until just mixed
- Add food coloring for light green tint if desired
Pro Tip: This dough is intentionally forgiving – slightly overmixed cookies still taste great and kids can handle it without worry.
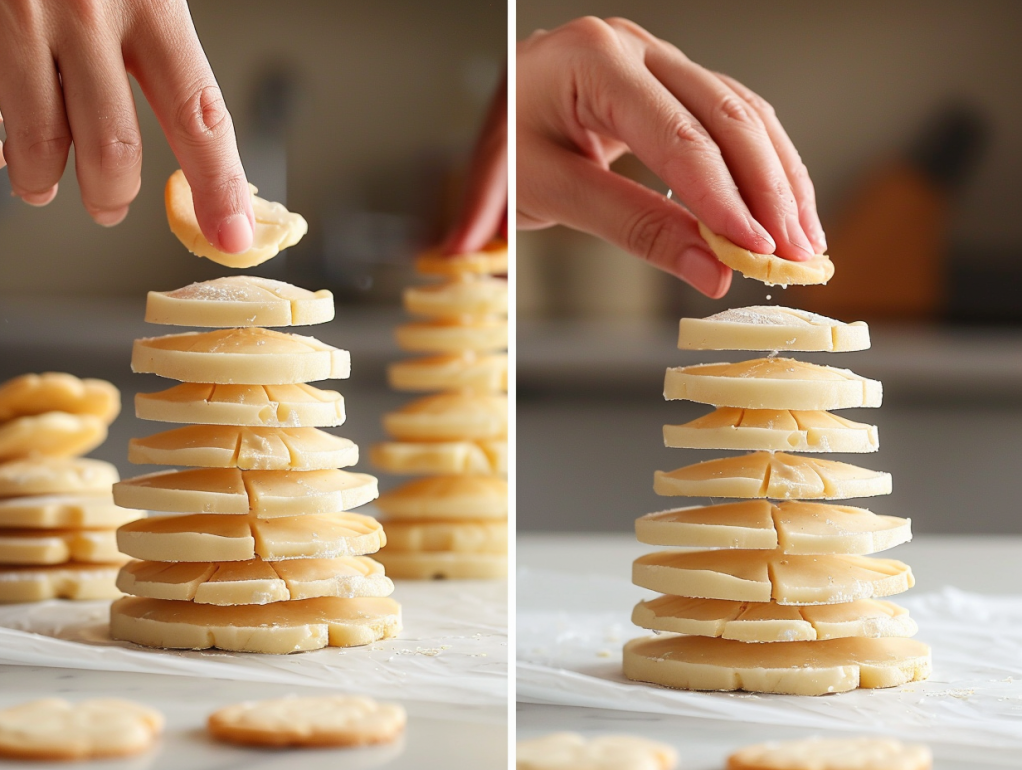
Step 2: The Three-Tree Cutting Technique That Creates Magic (15 minutes)
Equipment Needed:
- 3 different sized round cutters (or nested tree cutters)
- Large: 3-inch diameter
- Medium: 2-inch diameter
- Small: 1-inch diameter
- Rolling pin and parchment paper
The Stacking Method:
- Roll dough to 1/4-inch thickness (thicker than regular cookies for stability)
- Cut equal numbers of each size – they’ll stack to form trees
- Place large circles on parchment, medium centered on large, small centered on medium
- Gently press to adhere layers before baking
- Optional: Use star-shaped cutter for tree toppers
Success Secret: The stacked approach creates natural dimension and makes decorating easier because kids can treat each “layer” separately.
Step 3: The Perfect Air Fryer Baking and Decorating Process (12 minutes baking, 30 minutes fun)
Baking Instructions:
- Preheat air fryer to 325°F (lower than single-layer cookies)
- Line basket with parchment, trim excess
- Bake stacked cookies 10-12 minutes until edges are lightly golden
- Cool completely before decorating (about 15 minutes)
Decorating Setup:
- Cover workspace with parchment paper
- Provide each child with their own small bowl of green icing
- Set up “decorating stations” with different toppings
- Have damp paper towels ready for quick cleanups
Visual Cues for Success: Cookies should feel firm but not hard, icing should spread easily but not run off edges, and kids should be smiling more than they’re frowning!
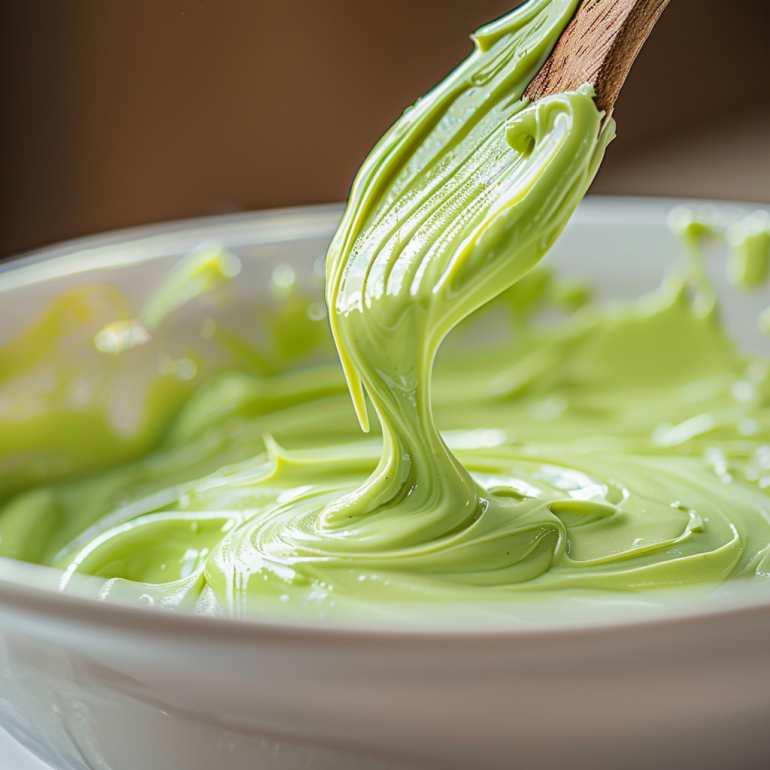
Foolproof Green Icing Mastery
The Perfect Green Icing Formula:
- 3 cups powdered sugar, sifted
- 4-5 tablespoons milk
- 2 tablespoons corn syrup (for shine and smooth spreading)
- 1 teaspoon vanilla extract
- Green food coloring (gel works best)
- Pinch of salt
Kid-Friendly Mixing Method:
- Kids can sift powdered sugar (with help)
- Adults add liquids and mix until smooth
- Let kids add green coloring drop by drop until desired shade
- Test consistency – should coat spoon but not be runny
- Divide into small bowls for multiple decorators
Icing Application Tips:
Start with base layer of green icing using back of spoon. Let kids add “ornaments” with colorful candies while icing is still wet. Finish with star on top or powdered sugar “snow.”
Quick Troubleshooting
Problem: Cookie layers sliding apart during baking
Fix: Press layers together more firmly, reduce air fryer temperature to 315°F
Problem: Icing too thick for kids to spread
Fix: Add milk 1 teaspoon at a time until easily spreadable
Problem: Green icing looks artificial or too bright
Fix: Add tiny drop of brown food coloring to create more natural forest green
Problem: Kids getting frustrated with decorating
Fix: Simplify options to just green icing + one type of “ornament” candy
Perfect Christmas Tree Air Fryer Cookies Recipe
Ingredients
For the Cookies:
- 2¾ cups all-purpose flour
- 1 teaspoon baking powder
- 1 teaspoon salt
- 1 cup unsalted butter, softened
- 1½ cups granulated sugar
- 1 large egg
- 1 teaspoon vanilla extract
- ½ teaspoon almond extract
- 2-3 drops green food coloring (optional)
For Green Tree Icing:
- 3 cups powdered sugar, sifted
- 4-5 tablespoons milk
- 2 tablespoons corn syrup
- 1 teaspoon vanilla extract
- Green gel food coloring
- Pinch of salt
For Decorating:
- Mini chocolate chips (ornaments)
- Small yellow candies (stars)
- Rainbow sprinkles (lights)
- Powdered sugar (snow)
Method
Step 1: Make the Dough
- Whisk flour, baking powder, and salt in large bowl
- Cream butter and sugar until light and fluffy
- Beat in egg, vanilla, and almond extract
- Add green coloring if using
- Gradually mix in dry ingredients until just combined
- Wrap and chill 30 minutes
Step 2: Shape the Trees
- Roll chilled dough to 1/4-inch thickness
- Cut equal numbers of large (3″), medium (2″), and small (1″) circles
- Stack on parchment: large bottom, medium middle, small top
- Press gently to adhere layers
- Preheat air fryer to 325°F
Step 3: Bake
- Line air fryer basket with trimmed parchment
- Place 2-3 tree cookies per batch (don’t overcrowd)
- Bake 10-12 minutes until edges are lightly golden
- Cool completely on wire racks
Step 4: Make Icing and Decorate
- Mix powdered sugar, milk, corn syrup, vanilla, and salt
- Add green coloring until desired shade
- Let kids spread icing on cooled cookies
- Add “ornaments” and decorations while icing is wet
- Let set 30 minutes before serving
Yields: 12 large tree cookies | Prep: 45 min | Chill: 30 min | Cook: 12 min per batch | Decorating: 30 min | Total: 2 hrs
Notes
- Double the recipe for classroom treats or cookie exchanges
- Use different cookie cutter shapes for variety (stars, presents, candy canes)
- Cookies keep decorated for 3-4 days in airtight containers
- Kids ages 3+ can help with supervision; ages 6+ can work more independently

4 Skill-Level Decorating Variations
1. Preschooler Simple (Ages 3-5)
What They Can Do: Spread green icing with spoon, place large candy “ornaments”
Adult Help Needed: Icing consistency, preventing over-decorating
Results: Charmingly imperfect trees with personality
2. Elementary Expert (Ages 6-9)
What They Can Do: Pipe icing borders, create patterns with sprinkles, add detail work
Adult Help Needed: Icing bag setup, technical guidance
Results: Recognizable Christmas trees with creative flair
3. Tween Perfectionist (Ages 10-12)
What They Can Do: Detailed piping, color mixing, advanced techniques
Adult Help Needed: Recipe guidance, oven safety supervision
Results: Pinterest-worthy cookies with personal style
4. Family Team Approach
Everyone Together: Assembly line with different family members handling different decorating steps
Benefits: Faster completion, shared memories, less mess per person
Results: Consistent cookies with collaborative family pride
Perfect Pairings
Complete Family Baking Experience:
- Christmas tree cookies + hot chocolate bar setup
- With Christmas music playlist and cozy blankets
- Alongside cookie decorating aprons for each child
- Served with family Christmas movie marathon
Holiday Party Setup:
- Cookie decorating station as party activity
- Individual take-home bags for each child guest
- Camera setup for capturing decorating process
- Display finished cookies on tiered stands
Storage and Gift-Giving Tips
Immediate Enjoyment:
- Serve within 2 hours of decorating for best texture
- Display on festive plates for family admiration
- Take photos before anyone takes a bite!
Make-Ahead Strategy:
- Cookie dough: Make up to 3 days ahead, refrigerate
- Baked cookies: Store undecorated up to 1 week
- Decorated cookies: Best within 3-4 days
Gift Presentation:
- Clear cellophane bags with festive ribbons
- Include “Made with Love by [Child’s Name]” tags
- Pack in single layers to prevent decoration damage
- Great for teachers, neighbors, and grandparents
The Family Bonding Perspective
Why This Activity Works for Families:
- Low pressure environment – mistakes become “character”
- Age-appropriate tasks for different developmental levels
- Immediate gratification – kids see results quickly
- Sense of accomplishment from start-to-finish participation
Memory-Making Benefits: Children remember the process, not perfection. Focus on fun, laughter, and time together rather than Pinterest-perfect results.
Perfect for families wanting to create lasting Christmas memories while teaching basic baking skills and encouraging creativity in a supportive environment!
Frequently Asked Questions
At what age can kids start helping with this recipe?
Children as young as 3 can help with measuring dry ingredients and placing decorations. Ages 6+ can handle most decorating independently with supervision for baking steps.
Can I make these if we don’t have tree-shaped cookie cutters?
Absolutely! Use round cutters in graduated sizes, or even cut squares and triangles with a knife. The stacking method works with any shapes.
How do I prevent the icing from getting everywhere?
Cover the workspace completely with parchment paper, give each child their own small icing bowl, and keep wet paper towels handy. Expect some mess, it’s part of the fun!
What if my child gets frustrated during decorating?
Simplify immediately. Sometimes offering just green icing and one type of candy is better than overwhelming choices. Remember, the goal is fun, not perfection.
Can we make these dairy-free or gluten-free?
Yes! Substitute butter with vegan alternative and use 1:1 gluten-free flour blend. The recipe is very adaptable to dietary restrictions.
How far in advance can I make the cookies?
Bake the cookies up to 1 week ahead and store in airtight containers. Decorate 1-2 days before serving for best appearance and taste.
What’s the best way to transport decorated cookies?
Use containers with tight-fitting lids and place cookies in single layers separated by parchment paper. Avoid stacking decorated cookies.
Can adults enjoy this activity too?
Absolutely! Many parents find cookie decorating surprisingly relaxing and therapeutic. It’s a great way for the whole family to unwind together during the busy holiday season.
Want more Christmas family baking adventures that create memories AND delicious treats? Join over 15,000 confident home cooks getting weekly tested recipes and holiday activities that work for real families. For more Recipe Follow us in Pinterest.
Get My FREE +30 Recipe Air Fryer Desserts
Related Christmas Family Fun You’ll Love:
Air Fryer Gingerbread Cookies – Christmas tradition made easy
Air Fryer Snickerdoodles – Soft Christmas cookies in 8 minutes
Swedish Candy – Family Snack Timeok